In summary:
- Standard IP54 ratings are insufficient against heavy rain; they only protect from light splashes, not sustained jets or immersion.
- Proactively seal critical electronic connectors with dielectric grease or ACF-50 to prevent corrosion before it starts.
- If electronics get wet, never use a hair dryer. Use unheated compressed air and allow at least 24 hours for passive drying to avoid thermal shock.
- Implement a weekly inspection of all rubber seals, grommets, and cable entry points to catch degradation before it leads to water ingress.
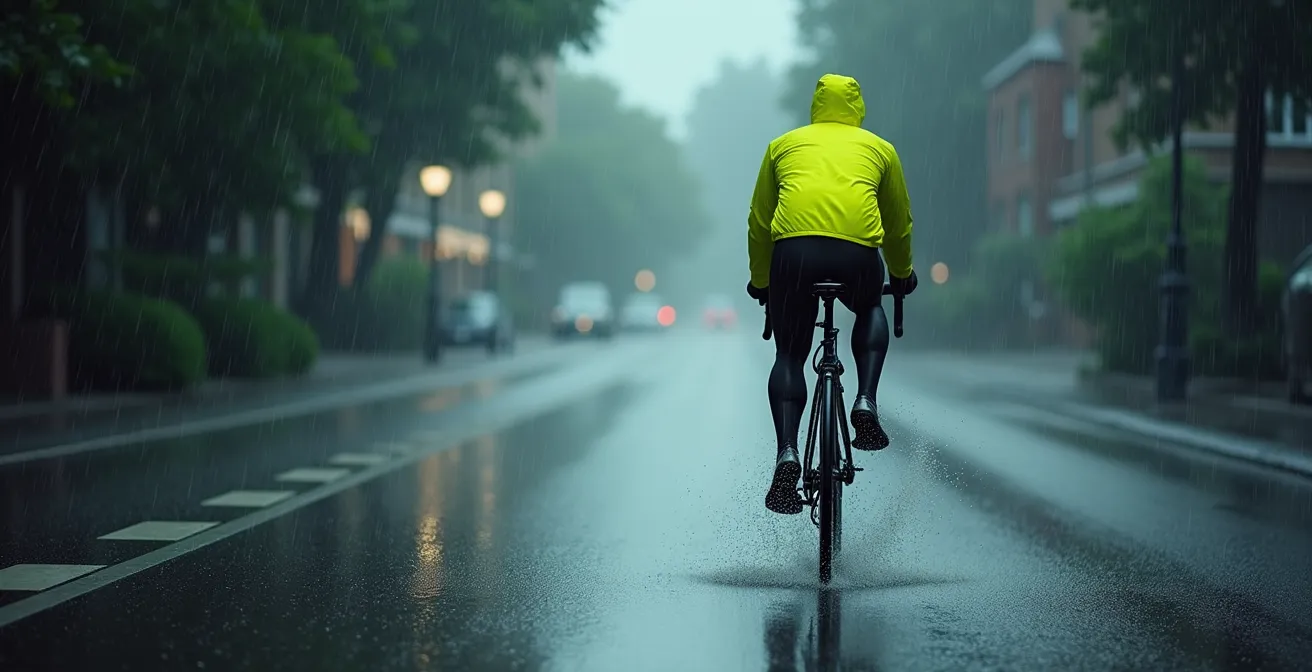
The dark clouds gather, and the forecast promises rain for your commute home. For an all-weather e-bike commuter, this moment brings a familiar anxiety. You’ve invested a significant amount in your machine, and the thought of a stray water droplet short-circuiting the controller or battery is a constant worry. Most manufacturers claim their bikes are “water-resistant,” often citing an IP rating, and common advice revolves around simply wiping the bike down and hoping for the best. This approach, however, fundamentally misunderstands the physics of water ingress on a moving vehicle.
Relying on a factory rating alone is a passive and often failing strategy. The vibrations of the road, the aging of rubber seals, and the high-pressure spray from your own wheels create an environment far more hostile than any static lab test. Water, especially when mixed with road salt, is a relentless solvent that seeks out the smallest micro-cracks and imperfections. True protection for your expensive electronics isn’t about a single feature or rating; it’s about adopting a systematic, multi-layered defense protocol.
This is where an engineering mindset becomes crucial. Instead of just hoping your bike is waterproof, you must actively ensure it is. This guide moves beyond the platitudes. We will deconstruct why common IP ratings are misleading, provide a technical protocol for sealing vulnerable connections, detail the correct emergency procedures for drowned components, and establish a preventative maintenance routine. The goal is to shift your approach from reactive fear to proactive confidence, empowering you to ride in any weather without risking your investment.
This article provides a complete framework for safeguarding your e-bike’s delicate systems. By understanding the failure points and implementing these specialist-grade protocols, you can ensure your bike remains a reliable partner for thousands of miles, rain or shine. Explore the sections below to build your comprehensive moisture defense strategy.
Summary: Riding in the Rain: Protecting Sensitive Electronics from Moisture Damage
- Why IP54 Is Not Enough for Riding in Heavy Downpours?
- How to Seal Connections Against Salt and Water in 10 Minutes?
- Air Dry vs Hair Dryer: Which Method Saves Drowned Electronics?
- The Mistake of Trusting Rubber Covers That Have Hardened Over Time
- When to Add Mudflaps to Keep Spray Off the Bottom Bracket Motor?
- How to Wash Waterproof Gear Without Destroying the DWR Coating?
- The Error of Waiting for Perfect Weather That Kills Your Riding Habit
- The 15-Minute Weekly Inspection Routine That Prevents 80% of Roadside Breakdowns
Why IP54 Is Not Enough for Riding in Heavy Downpours?
The Ingress Protection (IP) rating is the first line of defense advertised by manufacturers, and IP54 is a common standard for e-bikes. However, understanding what this rating truly means is critical. The ‘5’ indicates protection against dust ingress, while the ‘4’ signifies protection against splashing water from any direction. The critical flaw in relying on this is the test’s nature: it simulates gentle splashes, not the high-pressure, persistent assault of riding through a downpour or deep puddles. Ingress Protection standards confirm that IP54 devices can withstand splashes but not water jets or immersion.
When you ride at speed, your front wheel acts like a pressure washer, directing a focused jet of water and grit at the most vulnerable parts of your bike: the bottom bracket motor, the controller housing, and low-hanging cable connectors. This force is far beyond what an IP54 rating is designed to handle. Furthermore, the IP rating is determined in a static lab environment on a brand-new product. It doesn’t account for IP degradation over time. Seals harden, housings develop micro-cracks from vibration, and the protective barrier weakens.
The consequences of this misunderstanding can be severe. As explained in analysis of real-world component failure, exposing electronic components to moisture can cause extensive damage to an e-bike’s battery, motor, controller, and display. Water, especially when containing dissolved road salts, is an excellent electrical conductor and a corrosive agent. Once inside a component, it can lead to short circuits, galvanic corrosion between dissimilar metals on a circuit board, and ultimately, catastrophic failure that is often not covered by warranty.
Therefore, you must treat the IP54 rating not as a guarantee of waterproofness, but as a baseline level of splash resistance that requires significant reinforcement for reliable all-weather commuting. It protects against being caught in a light shower, not against the deliberate act of riding through sustained, heavy rain.
How to Seal Connections Against Salt and Water in 10 Minutes?
Since the factory seals are insufficient, the most effective proactive step is to create a secondary barrier at the most vulnerable points: the electrical connectors. These junctions for the motor, battery, display, and sensors are the primary gateways for water ingress. A simple 10-minute sealing protocol, performed every 6-12 months, can prevent the vast majority of moisture-related failures. The key is using the right material to displace moisture and prevent corrosion without impeding electrical conductivity.
The two primary materials for this task are dielectric grease and a dedicated corrosion inhibitor film like ACF-50. Dielectric grease is a non-conductive, silicone-based compound that seals out moisture. It should be applied sparingly to the *outside* of the male connector housing and around the wire entry points, not on the pins themselves. This creates a watertight gasket when the connection is made. For connections in high-spray areas, like the motor connector, a more robust solution is warranted.
Corrosion inhibitors are superior for these critical applications. As noted by experienced technicians in e-bike communities, ACF-50 kills the corrosion process with just one application and can last up to 24 months. It forms an ultra-thin, non-drying film that actively displaces water and prevents oxidation. It’s particularly effective at protecting the delicate pins inside connectors.
ACF-50 kills the corrosion process with just one application and will last for 24 months. Microswitches, cannon plugs, and relays will remain corrosion free. Plus, ACF-50 will easily free seized nuts, screws and bolts.
– Electric Bike Forum Community, Electric Bike Forums Discussion
Before applying any protectant, it is crucial to clean any existing corrosion. Use an electronic contact cleaner to spray the connectors and gently scrub with a small brush if you see any white or green powder. Once clean and dry, apply your chosen protectant. This small investment of time creates a robust, secondary line of defense that factory seals alone cannot provide.
Air Dry vs Hair Dryer: Which Method Saves Drowned Electronics?
Despite the best preventative measures, a severe deluge or an unexpected submersion might lead to water getting inside a component like the display or controller. In this critical moment, your immediate actions determine whether the component is salvageable or destined for the scrap heap. The most common and dangerous mistake is reaching for a hair dryer. While it seems logical to apply heat to evaporate water, this can cause irreversible damage through thermal shock.
Electronic circuit boards are assembled with solder, which has a specific melting point. Even moderate heat from a hair dryer can cause uneven expansion of the board, components, and solder joints, leading to micro-fractures in the connections. This damage is often invisible to the naked eye but results in intermittent or permanent failure. The correct approach is to use unheated, forced air and a desiccant.

The moment you suspect water ingress, follow this safe drying protocol. First, immediately power down the entire e-bike system and, if possible, remove the battery and the affected component. Wipe away all visible surface water with a microfiber cloth. Then, use a can of compressed air (for electronics, not tires) or a camera lens blower to gently force unheated air into seams, ports, and openings. This pushes out trapped water droplets without the risk of thermal shock. Finally, place the component in a sealed container with several silica gel packets for at least 24-48 hours. Silica is a powerful desiccant that will passively absorb any remaining water vapor from deep within the electronics, something air drying alone cannot achieve. Do not use rice, as it creates dust that can cause further problems.
Patience is the most crucial tool in this process. Even after the component appears dry, wait an additional 24 hours before reconnecting it to power. This ensures that no hidden moisture remains to cause a short circuit. This methodical, patient approach gives your electronics the best possible chance of a full recovery.
The Mistake of Trusting Rubber Covers That Have Hardened Over Time
Many e-bikes rely on simple rubber or silicone covers to protect charging ports, USB ports, and connector junctions. When new, these covers are flexible and form a tight seal. However, exposure to UV light, ozone, and temperature fluctuations causes the material to degrade over time. They become hard, brittle, and lose their elasticity, creating gaps that allow water to seep in. Trusting these aged seals is a common and costly mistake.
A hardened rubber cover may look like it’s in place, but it no longer provides a reliable seal against pressurized water spray. This degradation is often gradual and easy to overlook until it’s too late. The same principle applies to the rubber grommets where cables enter the bike frame. If these lose their flexibility, they can channel water directly into the frame, where it can pool around the controller or internal battery connections. This makes regular inspection of all passive sealing components a non-negotiable part of any waterproofing strategy.
Luckily, diagnosing a failing seal takes only a few seconds. A simple pinch test can reveal the health of the material. A healthy rubber cover will rebound instantly when pinched, while a degraded one will feel stiff and respond slowly. Visual inspection under a bright, angled light can also reveal micro-cracks that are invisible in normal lighting. For covers that are only slightly hardened, an application of a silicone-based conditioner can restore some flexibility, but any cover that is stiff or visibly cracked must be replaced immediately.
Action Plan: 5-Second Rubber Seal Diagnostic
- Pinch Test: Firmly pinch each rubber port cover between your thumb and forefinger for three to five seconds.
- Rebound Check: Release the cover and observe its response. It should snap back to its original shape instantly. A slow, delayed response indicates material degradation.
- Crack Inspection: Shine a bright light at a low angle across the surface of the cover and any wire grommets. Look for tiny, spiderweb-like micro-cracks.
- Flexibility Check: Gently bend the cover. If it feels stiff or resists bending, its sealing ability is compromised.
- Replacement Decision: Immediately order a replacement for any cover that fails the rebound test or shows visible cracking. Temporary measures are not a substitute for a proper seal.
For extra protection, especially in winter, consider supplemental covers. As one user noted, “If you are riding your ebike in low temperatures, you should simply put a neoprene cover on the battery. It provides effective thermal protection and keeps out most of the extreme cold.” This same logic applies to rain protection for critical components.
When to Add Mudflaps to Keep Spray Off the Bottom Bracket Motor?
While sealing connectors and inspecting covers are forms of micro-level defense, a crucial macro-level strategy is to simply reduce the amount of water hitting your bike in the first place. This is the primary function of fenders (mudguards), but standard fenders often aren’t long enough to be fully effective. The high-velocity spray coming off the bottom of the front wheel is often directed straight at the most expensive and vulnerable component: a mid-drive motor located at the bottom bracket.
Adding extended mudflaps to your existing fenders is one of the single most effective upgrades for an all-weather commuter. You should consider adding them immediately if your rides involve any of the following: frequent rain, wet roads even after rain has stopped, or routes that include puddles. A mudflap is a flexible extension, typically made of rubber or durable plastic, that attaches to the end of a fender. It extends the fender’s coverage downwards, often to within a few inches of the ground.
This extension dramatically alters the trajectory of wheel spray. Instead of flinging water upwards and backwards onto the motor, chain, and your feet, it directs the spray downwards and back onto the pavement. This significantly lessens the “pressure washer” effect on your motor housing and electrical connections, reducing the load on their primary seals and your secondary sealing efforts. It’s a simple, mechanical first line of defense that enhances the effectiveness of all other waterproofing measures.
The technical team at Aventon Bikes, a major e-bike manufacturer, emphasizes this point as a core part of their rain-riding guidance. Their perspective underscores the importance of this mechanical shield.
When you’re on the road during a rainy ride, fenders and mudguards help protect important ebike components like the battery and motor from splashes and spray… By adding fenders, you can limit the amount of water that comes into contact with these components.
– Aventon Bikes Technical Team, Aventon E-Bike Rain Riding Guide
Adding mudflaps is not just about keeping you clean; it’s a critical engineering decision to protect the heart of your e-bike. If your bike has a mid-drive motor, this cheap and simple upgrade should be considered mandatory, not optional.
How to Wash Waterproof Gear Without Destroying the DWR Coating?
A reliable bike is only half of the all-weather equation; a reliable rider is the other. Your personal waterproof gear—jacket, pants, gloves—is what makes riding in the rain tolerable, even enjoyable. This gear relies on a technology called Durable Water Repellent (DWR) coating. DWR is a chemical finish applied to the exterior of the fabric that causes water to bead up and roll off, rather than soaking in. However, dirt, body oils, and, most importantly, conventional laundry detergents can clog and strip this coating, destroying your gear’s performance.
Washing your technical apparel correctly is a form of maintenance just as critical as sealing your bike’s connectors. Regular detergents contain surfactants and optical brighteners designed to help water penetrate fabric, which is the exact opposite of what you want. They leave behind a hydrophilic (water-attracting) residue that masks the DWR finish, causing the fabric to “wet out.” When this happens, the garment’s breathability is also compromised, trapping perspiration and making you feel clammy and cold from the inside.

The correct procedure involves two stages: cleaning and reactivating. First, wash the garment using a specialized tech wash designed for waterproof fabrics. These cleaners rinse away contaminants without leaving any residue. After washing, the DWR often needs to be reactivated with low, gentle heat. Tumble drying the garment for 20 minutes on a low setting is typically enough to restore the finish. You can test its effectiveness by flicking a few drops of water onto the fabric; if they bead up and roll off, the DWR is active. If they start to soak in, it’s time for the second stage: re-application.
Re-proofing products come in two forms: spray-on and wash-in. Spray-on treatments are best for multi-layer garments with wicking liners, as they allow you to treat only the exterior fabric. Wash-in products are simpler but should only be used for single-layer shells without liners, as they will coat the entire garment, reducing the wicking performance of the inner fabric. Maintaining your gear ensures you stay dry, comfortable, and motivated to ride, regardless of the weather.
The Error of Waiting for Perfect Weather That Kills Your Riding Habit
The single greatest threat to a consistent cycling habit is not mechanical failure or lack of fitness; it’s the “perfect weather” fallacy. Many commuters start with the best intentions, only to find their bike gathering dust during the autumn and winter months because it’s “too wet” or “too cold.” By allowing weather to dictate your riding schedule, you surrender control and break the momentum that forms a lasting habit. Embracing all-weather riding is a mindset shift that transforms the e-bike from a seasonal toy into a year-round transportation tool.
The technical preparations detailed in this guide are the foundation of this mindset. When you know, with technical certainty, that your bike is protected and your gear will keep you dry, the mental barrier to riding in the rain dissolves. The anxiety of potential damage is replaced by the confidence of preparedness. This transforms a rainy day from an obstacle into an opportunity—a chance to enjoy quieter streets, fresher air, and the unique satisfaction of arriving at your destination warm and dry while others are stuck in traffic.
As the editorial team at Favoritebikes puts it, the experience can be surprisingly rewarding if you are ready for it. Their perspective captures the shift from challenge to enjoyment.
Riding an e-bike in the rain can be surprisingly enjoyable — if you’re prepared. The fresh air, fewer crowds, and peaceful streets make it worth it, but moisture, visibility, and road grip can all become challenges. This guide will help you master wet-weather e-biking, from essential gear to protecting your e-bike’s electrical components.
– Favoritebikes Editorial Team, Rainy Day Riding Guide
By investing in proper waterproofing for both your bike and yourself, you are not just preventing damage; you are buying back dozens, if not hundreds, of potential riding days each year. You are breaking the cycle of seasonal riding and building a resilient, year-round habit. The error is not in the weather itself, but in waiting for it to be perfect instead of preparing for it to be real.
Key Takeaways
- An IP54 rating is a baseline for splash protection, not a guarantee against the high-pressure spray encountered during real-world rainy rides.
- Proactive defense is critical: use dielectric grease and corrosion inhibitors like ACF-50 to seal connectors before they are exposed to moisture and salt.
- Never use heat to dry wet electronics. The risk of thermal shock damage to solder joints is high. Use unheated air and desiccants for safe recovery.
The 15-Minute Weekly Inspection Routine That Prevents 80% of Roadside Breakdowns
The principles and techniques discussed so far—understanding IP ratings, sealing connectors, and using correct drying methods—form a powerful system for moisture defense. However, this system is not a “set it and forget it” solution. The dynamic stresses of daily riding mean that seals degrade, connections can loosen, and new vulnerabilities can appear. The final and most crucial piece of the puzzle is transforming this knowledge into a simple, repeatable habit: the 15-minute weekly waterproofing inspection.
This routine is not about a full teardown; it’s a quick, focused check of the most common failure points. By spending a few minutes each week, you can catch incipient failures—problems in their earliest stages—before they lead to a catastrophic and expensive breakdown on a rainy commute. This proactive mindset is the difference between a reliable all-weather vehicle and a ticking time bomb. The goal is to make this inspection as automatic as checking your tire pressure.
The routine should focus on visually and physically inspecting all the primary water entry points. Trace your main cables from the handlebars to the motor, checking the rubber grommets where they enter the frame. Squeeze the port covers for your battery and display to ensure they are still pliable. Use a flashlight held at an oblique angle to illuminate the housing of your display and controller, which makes hairline cracks much more visible. A quick visual check of your main motor and battery connectors for any signs of green or white powder (corrosion) can alert you to a failing seal long before it causes a problem. For example, moisture in a display is a common issue caused by degraded seals, and catching it early means you can simply dry it and add a protective cover, rather than replacing the whole unit.
This weekly ritual consolidates all the protective principles into a manageable action plan. It reinforces your understanding of the bike’s systems and builds a deep, practical confidence in your machine’s ability to handle any weather. This is the ultimate expression of taking control and refusing to let the weather dictate your mobility.
By integrating this fast, simple inspection into your weekly routine, you move from hoping your bike is weatherproof to knowing it is. This is the final step in becoming a truly confident, all-weather commuter.