
The common advice to carry a generic, pre-made bike kit is a critical mistake for the modern urban e-bike commuter.
- Your kit must be custom-built around the specific fasteners (like T25 Torx) and high-volume tires of your e-bike.
- Success is measured in time: the minutes it takes to fix a flat on a heavy bike, or the seconds it takes a thief to cut your lock.
Recommendation: Your goal is not to carry a workshop, but to achieve minimum viable self-sufficiency—having the precise tools to overcome the most probable failures and get home safely.
The scenario is a cliché for a reason: you’re five miles from home, late for a meeting, and a sudden ‘thwump-thwump-thwump’ signals a flat tire. For the urban e-bike commuter, this isn’t a minor inconvenience; it’s a mission failure. The common wisdom is to carry a bulky, one-size-fits-all repair kit, turning your back into a mobile workshop. This approach is inefficient, heavy, and fundamentally misunderstands the nature of modern urban survival.
The reality is that most pre-packaged kits are designed for traditional road bikes and are dangerously obsolete for today’s e-bikes. They lack the right tools, the right inflation power, and the right mindset. This guide rejects the “pack everything” mentality. Instead, we’ll adopt the perspective of an urban survivalist, focusing on a minimalist, highly-effective kit tailored for short commutes. It’s not about what you can pack, but about what you can intelligently leave behind by understanding probabilities, failure points, and time-to-fix scenarios.
We will deconstruct the essential kit into its core components, analyzing the brutal trade-offs between speed, weight, and reliability for each item. This is about building a system for self-sufficiency that fits in a small saddlebag, not a backpack, ensuring you can handle the most likely roadside emergencies and get back on your way.
This article will guide you through the critical decisions needed to build your minimalist survival kit. We will cover the specific tools, repair strategies, and safety protocols essential for the modern urban e-bike warrior.
Summary: Building the Minimalist E-Bike Commute Kit
- Why Your Old Bike Tool Needs a T25 Torx for E-Bikes?
- Tube Swap vs Patch Kit: Which Is Faster on a Heavy E-Bike?
- CO2 Cartridges: Are They Powerful Enough for High-Volume E-Bike Tires?
- The Mistake of Relying Solely on the Bike’s Integrated Battery Lights
- When to Pack a Trauma Bandage vs Just Band-Aids?
- When to Use a Tubeless Plug vs Changing the Tube on a Rear Hub Motor?
- Why Cable Locks Are Cut in 3 Seconds and U-Locks Take 2 Minutes?
- Surviving Rush Hour: Defensive Riding Tactics for New Urban Cyclists
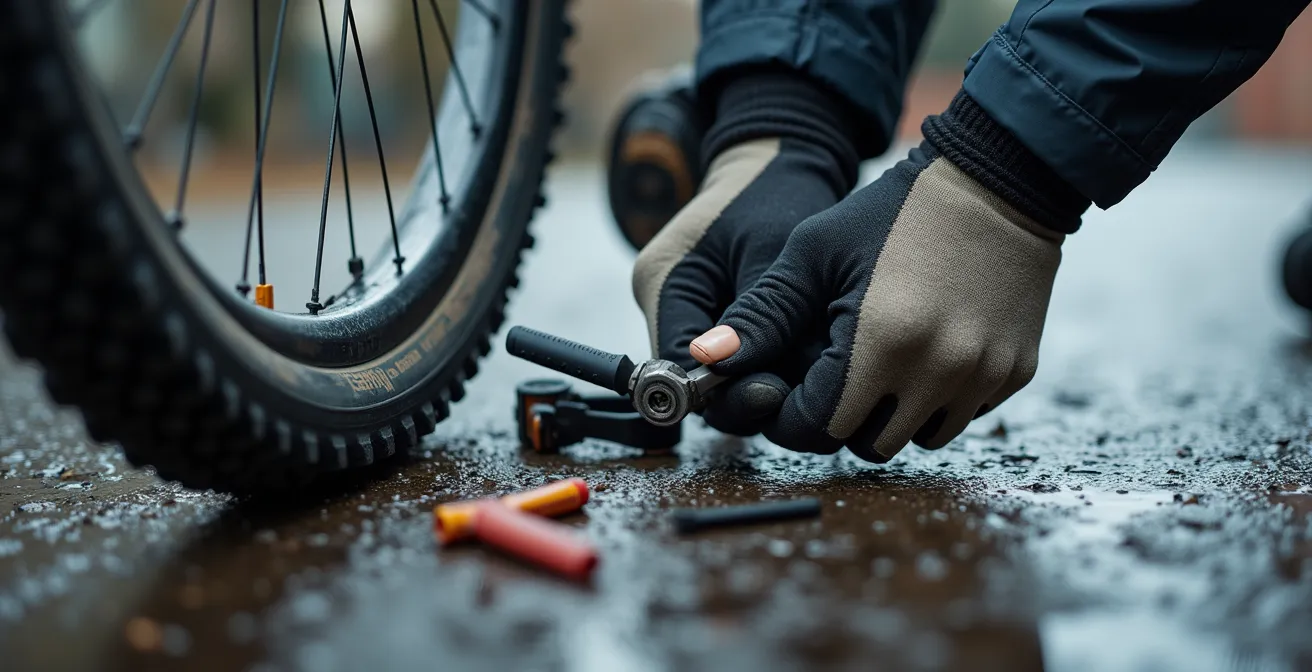
Why Your Old Bike Tool Needs a T25 Torx for E-Bikes?
The trusty Allen key multi-tool that has served cyclists for decades is now a liability. Modern e-bikes, with their higher torque from motors and more robust components like disc brakes, have largely abandoned traditional hex bolts. The new standard is the T25 Torx fastener, a star-shaped head designed to handle higher torque without stripping. Relying on an old multi-tool is like bringing a flip phone to a Zoom meeting; you’re unprepared for the current operating environment.
Many crucial components, from disc brake rotor bolts and stem clamps to shifter and lever mounts, now exclusively use Torx fasteners. An analysis of modern e-bikes, especially those with mid-drive motors, reveals that some models may not have a single critical part adjustable with a traditional Allen key. Your old tool is dead weight. The first step in building a survival kit is to perform an audit of your own machine. You must know its specific needs before you can pack for them.
This isn’t about buying the biggest multi-tool with the most attachments. It’s about surgical precision. Identify the exact fastener types and sizes on your bike, and build your kit around them. Anything else is a waste of space and weight, violating the core principle of minimalist self-sufficiency.
Your 5-Minute Personal Bike Audit Checklist
- Disc Brakes: Check all disc brake rotor bolts. Most now require T25 Torx, not Allen keys.
- Cockpit: Inspect stem, shifter, and brake lever clamp bolts. Many modern components use T25 or T30 Torx instead of 4/5mm hex keys.
- Accessories: Examine bolts on racks, fenders, and bottle cages. Document their type and size.
- Create a Master List: Document every single fastener type on your bike (e.g., T25, T30, 4mm Hex, 5mm Hex, 6mm Hex).
- Build Your Kit: Assemble a minimal custom tool kit based on your bike’s actual needs, not a generic, off-the-shelf multi-tool.
Tube Swap vs Patch Kit: Which Is Faster on a Heavy E-Bike?
The most common roadside failure is a flat tire, and the traditional response is a simple tube swap. However, on a heavy e-bike, especially one with a rear hub motor, “simple” is a dangerous assumption. Removing a rear wheel can involve disconnecting motor wires, wrestling with a 50+ pound frame, and significantly more time and frustration. The survivalist question isn’t “what’s the best fix?” but “what’s the fastest and most reliable fix under these specific, stressful conditions?”
The choice between swapping the tube and patching it becomes a critical calculation of time and success probability. In cold, wet conditions, finding a tiny puncture and getting a patch to adhere properly is a low-percentage game. A tube swap, while physically demanding, is more predictable. Conversely, for a rear wheel with a hub motor, attempting a patch without removing the wheel may be the only viable option to get you moving again.
The matrix below outlines the decision-making process based on a recent comparative analysis of roadside repair scenarios. It’s not about being a master mechanic; it’s about making the smartest tactical choice when you’re cold, dirty, and short on time. Your kit should therefore include both a spare tube and a reliable patch kit; the situation will dictate which tool you use.
| Scenario | Best Choice | Time Required | Success Rate |
|---|---|---|---|
| Front wheel puncture | Tube swap | 5-7 minutes | 95% |
| Rear hub motor wheel | Patch (if accessible) | 8-10 minutes | 80% |
| Cold/wet conditions | Tube swap | 7-10 minutes | 90% |
| Multiple punctures | Patch kit | 10-15 minutes | 75% |
CO2 Cartridges: Are They Powerful Enough for High-Volume E-Bike Tires?
A CO2 cartridge promises instant inflation, a tempting offer during a frantic roadside repair. But for an e-bike, often equipped with wide, high-volume tires (2.1 inches and up), this promise can be a catastrophic failure. A standard 16g cartridge, sufficient for a skinny road bike tire, will barely make an e-bike tire firm enough to ride on. Using an undersized cartridge is a waste of time and resources, leaving you with a soft tire and no way to inflate it further.
The key is matching the cartridge size to your tire volume. The goal of an emergency repair is not to achieve perfect pressure, but ‘rideable pressure’—typically 25-30 PSI—to get you home safely. For most e-bike tires, this requires a 20g or, more reliably, a 25g cartridge. It is a non-negotiable rule to carry a minimum of two cartridges, as a single failed inflation attempt would otherwise leave you stranded. Furthermore, CO2 is a temporary fix; the molecules permeate the rubber faster than air, meaning your tire will lose significant pressure within 24 hours. A proper top-up with a floor pump is mandatory once you reach your destination.
You must also handle the cartridge with a protective sleeve or glove, as the rapid discharge can cause severe frostbite. This isn’t just about power; it’s about a safe and effective protocol. The table below illustrates the pressure you can expect from different cartridge sizes on common e-bike tires.
| Tire Size | 16g CO2 | 20g CO2 | 25g CO2 |
|---|---|---|---|
| 2.1 inch | 20-25 PSI | 25-30 PSI | 30-35 PSI |
| 2.4 inch | 15-20 PSI | 20-25 PSI | 25-30 PSI |
| 2.8 inch | 12-15 PSI | 15-20 PSI | 20-25 PSI |
The Mistake of Relying Solely on the Bike’s Integrated Battery Lights
Your e-bike’s integrated lights, running off the main battery, seem like a perfect solution. They’re bright, convenient, and always there—until they’re not. There are two primary failure scenarios where this reliance becomes a critical vulnerability. The first is obvious: your main battery dies. Not only are you pedaling a 50-pound beast home without assistance, but you’re doing it invisibly. The second is more insidious: a wiring fault, a software glitch, or a damaged connection can disable your lights even with a full battery.
The survivalist principle at play here is redundancy. A system with a single point of failure is a fragile system. Experienced commuters understand this implicitly. A common practice among daily riders is to have their lights on even during daytime for visibility, and many take it a step further by implementing a multi-layered backup system. One case study revealed that dedicated commuters often carry as many as three front lights and three rear lights to ensure they are never without illumination.
For your minimalist kit, a full set of six lights is overkill. However, the principle holds. Your kit must contain at least one small, lightweight, and independently powered backup light for both the front and rear. These can be simple, USB-rechargeable “be-seen” lights that weigh next to nothing and can be stored in your saddlebag for months. Their job isn’t to illuminate the road ahead, but to ensure you remain visible to traffic in an emergency. Relying solely on your integrated system is a gamble you can’t afford to lose.
When to Pack a Trauma Bandage vs Just Band-Aids?
The term “first-aid kit” is dangerously vague. For most cyclists, it means a few adhesive bandages and an antiseptic wipe, which is perfectly adequate for minor scrapes. But a commute, even a short one, carries a non-zero risk of a more significant incident involving a collision with a vehicle or a high-speed fall. In these scenarios, a simple band-aid is utterly useless against major bleeding.
This is where risk-based packing becomes a life-or-death calculation. An analysis by ER doctors shows that while 99% of cycling injuries require only basic first aid, the 1% that require trauma intervention are the ones that can be fatal. A compact trauma bandage (like an Israeli bandage) is designed to apply significant pressure and control severe hemorrhaging. It is a piece of lightweight ‘life insurance’. In one documented case, a cyclist’s friend suffered a fall that opened her elbow to the bone; the antiseptic wipes and gauze in their basic kit were just enough to staunch the bleeding and allow them to get to a hospital. It highlights how quickly a situation can escalate beyond a simple scrape.

Your minimalist first-aid kit should be a two-tier system. Tier 1 is for the 99%: antiseptic wipes, various sizes of adhesive bandages, and perhaps some blister treatment. Tier 2 is for the 1%: a pair of nitrile gloves and a single, vacuum-sealed trauma bandage. The weight and space penalty is negligible, but the capability it provides is monumental. You pack it not because you expect to use it, but because you cannot afford not to have it if the unthinkable happens.
When to Use a Tubeless Plug vs Changing the Tube on a Rear Hub Motor?
For commuters who have upgraded to a tubeless tire system, the entire conversation around flats changes. The sealant inside the tire automatically handles most small punctures from thorns or glass, often without the rider ever knowing. This preventative measure is the highest form of preparedness: solving a problem before it becomes one. However, larger cuts or sidewall gashes can overwhelm the sealant, requiring manual intervention.
Here, the tubeless plug kit emerges as a revolutionary tool, especially for those with rear hub motors. Instead of the arduous process of removing the wheel, a tubeless plug repair is performed from the outside. You locate the hole, ream it out with a tool, and insert a sticky, rubberized “bacon strip” plug. The entire process can take less than two minutes and doesn’t require wheel removal, making it vastly superior to a tube swap on a complex rear wheel.
This method is so effective that it redefines the contents of a repair kit. Data from long-term tubeless users shows a dramatic reduction in roadside repairs, with some reporting that flats become so rare they only use a single CO2 cartridge every couple of years. For the tubeless commuter, the kit simplifies: a plug tool with several plugs, and a CO2 inflator for reinflation. A spare tube is still a wise backup for a catastrophic tire failure, but it becomes the option of last resort, not the primary plan. This is the essence of urban survival: using technology to eliminate entire categories of failure.
Why Cable Locks Are Cut in 3 Seconds and U-Locks Take 2 Minutes?
The most devastating failure on a commute isn’t mechanical—it’s the complete loss of your bike to theft. A cheap cable lock is not a security device; it’s a social courtesy. It signals “this bike is locked,” but to a thief with a pair of pocket-sized wire cutters, it’s a 3-second delay at most. The only factor that matters in bike security is time: how long does it take a thief, with the right tools, to defeat your lock?
An angle grinder is the modern thief’s tool of choice, and it makes quick work of most materials. The difference between lock types is measured in the minutes or seconds it takes for that grinder to cut through. A robust U-lock, made of hardened steel, forces the thief to make two cuts and can take upwards of two minutes, generating a shower of sparks and a deafening screech. This is a significant deterrent. A folding lock is a good compromise of security and portability, but a determined thief can often pop the rivets. A chain is only as strong as its weakest link and the steel it’s made of.
| Lock Type | Cut Time | Tool Required | Best Use Case |
|---|---|---|---|
| Cable Lock | 3-5 seconds | Wire cutters | 30-second coffee stop in view |
| Chain Lock | 30-60 seconds | Bolt cutters | Low-risk short stops |
| U-Lock | 2-3 minutes | Angle grinder | 1+ hour meetings |
| Folding Lock | 1-2 minutes | Bolt cutters/grinder | Medium-risk stops |
However, even the best lock is useless if used incorrectly. The legendary “Sheldon Brown method,” advocated by sources like reputable cycling publications, is a masterclass in efficiency. By passing a smaller, lighter U-lock through the rear wheel, the seat stays of the frame, and around a solid object, you immobilize the most expensive parts of the bike (frame and drivetrain). The thief cannot simply cut the wheel and steal the frame. This technique allows you to use a smaller, lighter lock for maximum security—the perfect survivalist trade-off.
Key Takeaways
- Your toolkit must be customized to your specific bike’s fasteners (T25 Torx) and tire size, rendering generic kits obsolete.
- Measure every repair and security choice in terms of time: the minutes to fix a flat versus the seconds for a thief to cut a lock.
- Prioritize prevention through robust systems like tubeless tires and defensive riding to eliminate failures before they happen.
Surviving Rush Hour: Defensive Riding Tactics for New Urban Cyclists
The ultimate act of self-sufficiency is not fixing a problem, but avoiding it entirely. The most sophisticated repair kit is useless in the back of an ambulance. For the urban commuter, survival is synonymous with defensive riding. This is a mindset, a protocol for actively managing risk in a chaotic environment filled with distracted drivers and unpredictable pedestrians.
Your first line of defense is route planning. Before you even get on the bike, use tools like the Google Maps cycling layer to identify routes with dedicated bike infrastructure. Actively avoid high-traffic arteries in favor of quieter streets, even if it adds a few minutes to your commute. This single decision dramatically reduces your exposure to threat vectors. Your mobile phone becomes a critical survival tool here, not just for navigation but as a lifeline. A “bailout plan” protocol involves three key uses: calling for help in an accident, documenting the scene with photos for insurance, and storing an ICE (In Case of Emergency) contact that medical personnel can access if you’re incapacitated.
Once on the road, your strategy is to be visible and predictable. Take the lane when necessary to avoid being squeezed against the curb or “doored” by parked cars. Make eye contact with drivers at intersections. Assume you are invisible and ride accordingly. This isn’t about being timid; it’s about controlling your environment and forcing others to acknowledge your presence. This proactive awareness is more valuable than any tool in your bag. It is the core skill that ensures you make it home safely, every single day.
Your journey to self-sufficiency begins now. Start by conducting the 5-minute audit of your own bike tonight. Identify your fasteners, measure your tires, and assess your current lock. Building the right kit is the first step in adopting the prepared, minimalist mindset of an urban survivor.