An error code isn’t a failure; it’s a diagnostic signal from your e-bike asking for attention before a real problem occurs.
- Most common errors stem from simple issues like loose connections, dirty pins, or incorrect shutdown procedures.
- Preventive care, such as regular inspections and proper cleaning, can eliminate over 80% of these electronic warnings.
Recommendation: Shift your mindset from reacting to codes to proactively maintaining your bike’s electronic health. This guide shows you how.
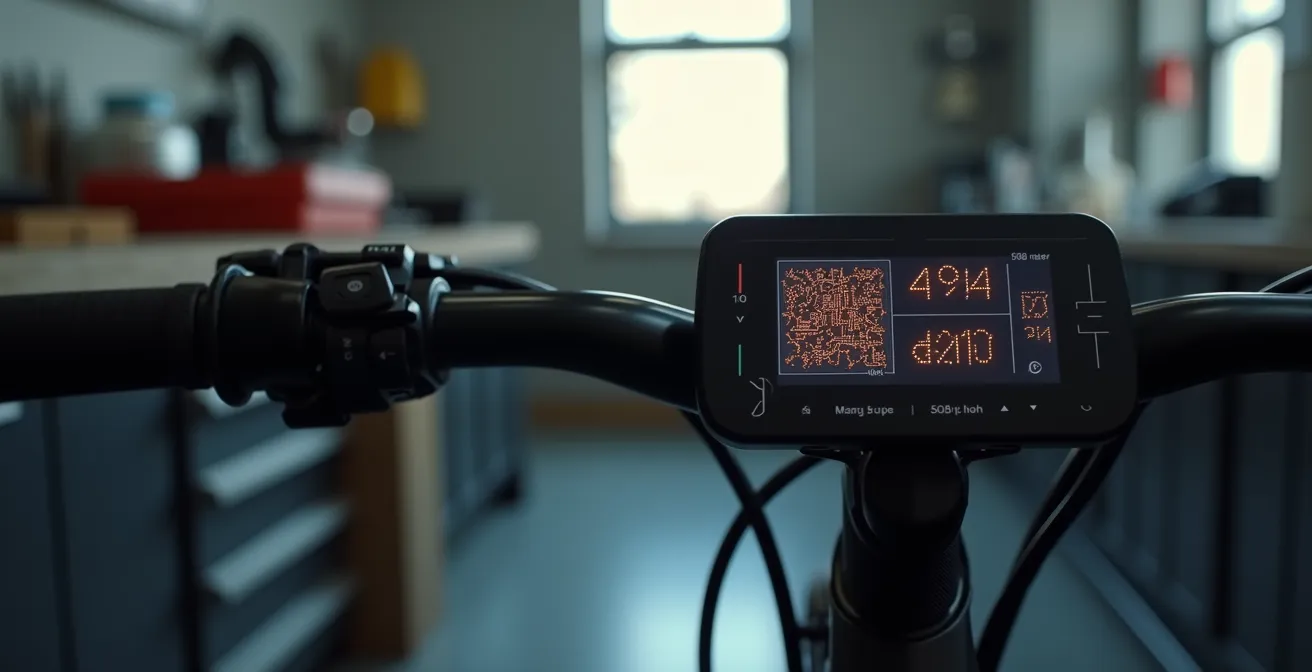
That flashing number on your e-bike’s display can trigger instant panic. It feels like a critical failure, a sudden and expensive end to your ride. The common response is to search for a long, confusing list of brand-specific codes, which often creates more anxiety than it resolves. You might be told to simply “check your battery” or “restart your bike,” but this advice rarely explains what is actually happening within the system.
But what if that error code isn’t a final verdict? What if it’s the first sign, a piece of diagnostic feedback? The key isn’t just knowing what a code *means*, but understanding the story it tells about your e-bike’s overall system health. Many issues that appear catastrophic, like a dead display or sudden power loss, often originate from minor, preventable causes such as moisture, oxidation on a connector pin, or even leaving Bluetooth active overnight.
This guide takes a different approach. Instead of a simple glossary of problems, we will adopt the calm, diagnostic mindset of a technician. We’ll decode the signals your bike is sending you. You will learn to distinguish between a minor software glitch and a genuine hardware fault, understand the physics of why a pressure washer is an e-bike’s worst enemy, and implement a simple routine that can prevent most of these electronic nightmares before they ever begin. It’s time to move from being a panicked owner to a confident diagnostician.
This article will guide you through the most common electronic issues, explaining not just the fix, but the reason behind it. By understanding the system, you gain control.
Summary: A Technician’s Guide to E-Bike Error Codes
- Why Error 21 and 30 Are the Most Common Nightmares for Riders?
- How to Clean Oxidation from Display Pins to Fix Intermittent Power?
- Restart vs Battery Pull: Which Fixes a Glitch vs a Short?
- The Mistake of Washing Your E-Bike with a Pressure Washer
- When to Visit the Shop: Codes You Cannot Fix at Home
- The Error of Leaving Bluetooth Always On That Drains 5% Overnight
- The Error of Ignoring Sensor Calibration That Causes Power Lag
- The 15-Minute Weekly Inspection Routine That Prevents 80% of Roadside Breakdowns
Why Error 21 and 30 Are the Most Common Nightmares for Riders?
Error 21 (Speed Sensor Fault) and Error 30 (Communication Fault) are two of the most frequent and frustrating codes an e-bike owner will encounter. They seem severe, often resulting in a complete loss of motor assistance, but they are rarely a sign of a catastrophic motor or battery failure. Instead, they are classic examples of your bike’s system telling you that a critical line of communication has been interrupted. These codes are often the electronic equivalent of a loose plug or a misaligned sensor, not a blown engine.
Error 21 typically means the controller has lost the signal from the speed sensor, usually a small magnet on a wheel spoke and a sensor on the frame. Without knowing how fast the bike is moving, the system shuts down for safety. The cause is often mechanical, not electronic: the magnet may have slipped out of alignment or the sensor got bumped. Error 30 is a broader communication issue. The controller, display, and motor are constantly talking. If any one of these components stops responding, Error 30 appears. This could be due to a loose wire, a corroded pin in a connector, or a wire damaged from rubbing against the frame.
The good news is that these “nightmares” are often simple to resolve. A diagnostic case study on Error 30 showed that by methodically disconnecting and reconnecting each component, the fault could be isolated in under 15 minutes in 80% of cases. In fact, many workshop technicians report that basic checks solve a surprising number of issues. The real lesson from these errors is the importance of physical connections; they are the most common point of failure in an otherwise robust system.
Ultimately, seeing an Error 21 or 30 shouldn’t cause panic. It should trigger a methodical inspection of the bike’s physical wiring and sensors—the nervous system of your e-bike.
How to Clean Oxidation from Display Pins to Fix Intermittent Power?
Intermittent power, a flickering display, or an e-bike that refuses to turn on after being caught in the rain are classic symptoms of poor “electrical hygiene.” The culprit is often not the battery or controller, but something far smaller: oxidation on the connector pins. These tiny metal surfaces are the gateways for power and data. When they corrode, they create resistance, disrupting communication and leading to phantom errors or a complete shutdown. This is especially common on pins for the display, battery terminals, and motor connections.
Oxidation appears as a greenish, bluish, or even black crust on the metal. It’s a chemical reaction caused by exposure to moisture and air. The key to fixing it is using the right tools and techniques for the level of corrosion you see. A gentle approach is always the first step, escalating only as needed. Think of it as a tiered medical treatment for your bike’s electronics.
The image below shows what different levels of oxidation can look like on connector pins, from a light tarnish to severe corrosion that can cause permanent damage if left untreated.
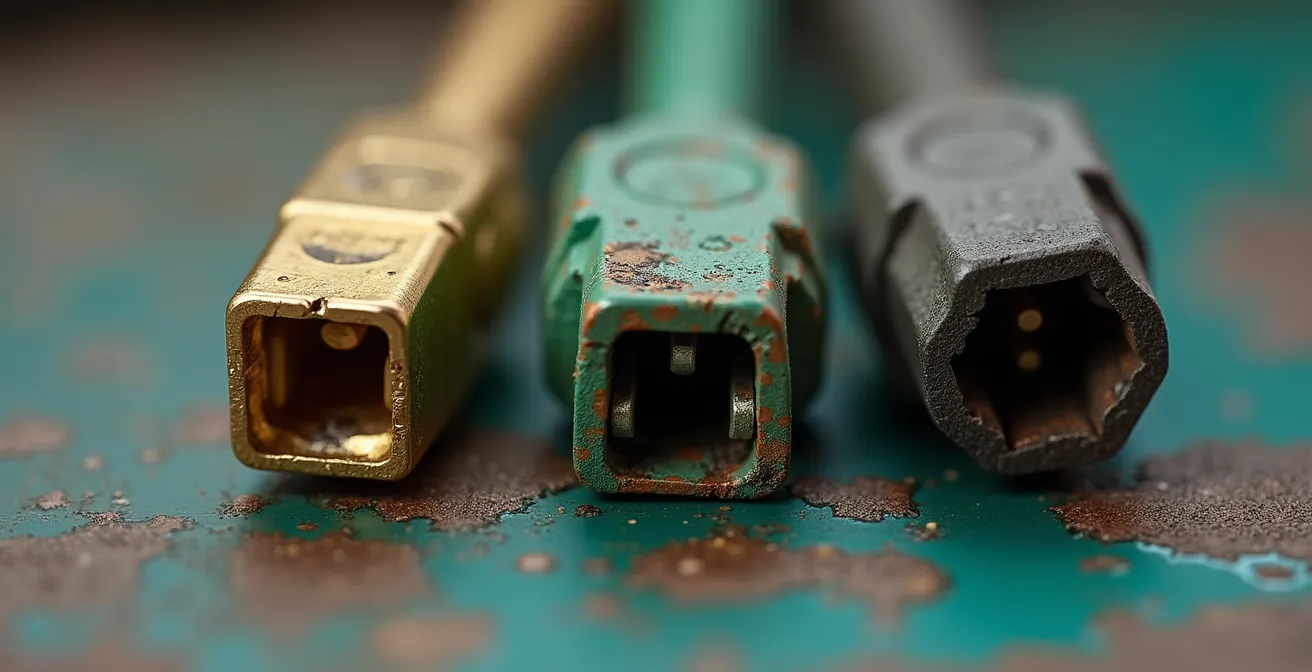
As you can see, the damage can range from minor discoloration to physical pitting of the metal. Addressing this early is crucial for maintaining a reliable connection and preventing costly component replacement down the line.
Your Action Plan: The 3-Tier Oxidation Cleaning Protocol
- Tier 1 (Light Tarnish): For minor discoloration, use a cotton swab lightly dampened with isopropyl alcohol (90% or higher). Gently rub the pins in a circular motion for about 30 seconds and let them dry completely.
- Tier 2 (Green/Blue Crust): For visible buildup, spray a dedicated electronic contact cleaner (like DeoxIT D5) directly onto the pins. Let it sit for 60 seconds to dissolve the corrosion, then gently scrub with a soft-bristled toothbrush.
- Tier 3 (Heavy Oxidation): For stubborn, blackened corrosion, spray with contact cleaner and carefully work the area with a small brass brush. Brass is softer than the pin material and less likely to cause damage.
- Prevention Step: After any cleaning, apply a thin layer of dielectric grease to the connector. This non-conductive grease seals out moisture and air, preventing future oxidation.
- Inspection Rule: If you see pitting or physical loss of metal on the pins, the component is compromised. At this stage, replacement is the only reliable solution.
Regularly inspecting and cleaning these connection points is one of the most effective preventive maintenance tasks you can perform. It transforms a potential ride-ending failure into a simple, five-minute fix.
Restart vs Battery Pull: Which Fixes a Glitch vs a Short?
When your e-bike’s display freezes or shows a persistent error, the instinct is to turn it off and on again. But not all resets are created equal. As a technician, I see a clear hierarchy of resets, each designed to solve a different level of problem. Understanding whether to perform a simple restart or a more forceful “battery pull” is key to resolving the issue without causing further complications. A restart addresses software glitches, while a battery pull deals with deeper system confusion, but neither will fix a physical short circuit.
A soft restart—powering the bike off and on with the display button—is like restarting a computer program. It clears temporary data from the controller’s memory and can resolve minor bugs, such as an unresponsive button or a momentary sensor misreading. However, it doesn’t reset the core systems like the Battery Management System (BMS).
A battery pull, or hard reset, is more drastic. Physically disconnecting the battery from the bike for a few minutes forces a complete power cycle. This compels the BMS to recalibrate and clears any “latched” error states in the controller. It’s the go-to solution for phantom battery readings (e.g., display shows 50% but the bike dies) or persistent communication errors that a soft restart couldn’t fix. For the deepest firmware glitches, some systems may even require a controller discharge, which involves holding the power button after the battery is removed to drain residual energy from capacitors.
The following table, based on common diagnostic procedures, clarifies which reset method to use in different situations.
| Reset Method | What It Does | When to Use | What It Fixes | Time Required |
|---|---|---|---|---|
| Soft Restart | Clears temporary software glitches | Frozen display, unresponsive buttons | UI bugs, temporary sensor misreads | 30 seconds |
| Battery Pull | Forces BMS recalibration & full system reset | Phantom battery readings, persistent errors | Communication errors, voltage calibration | 2-3 minutes |
| Controller Discharge | Drains residual capacitor energy | After battery pull for complete reset | Deep firmware glitches, persistent faults | 5-10 minutes |
It’s crucial to remember that if an error code immediately reappears after a battery pull, you’re likely dealing with a physical hardware problem, such as a damaged wire (a short) or a failed component, which no amount of resetting can resolve.
The Mistake of Washing Your E-Bike with a Pressure Washer
There is a deeply satisfying feeling in blasting away mud and grime with a pressure washer, but this is one of the most damaging things you can do to an e-bike. While e-bikes are designed to be water-resistant for riding in the rain, they are not waterproof. The high-pressure jet from a washer forces water past the rubber seals and gaskets that protect sensitive electronic components like the motor hub, controller, and connector junctions.
The danger lies in the vast difference between an e-bike’s water resistance rating and the force of a pressure washer. Most e-bike components are rated at IPX5 or IPX6. An IPX5 rating means it can resist a sustained, low-pressure water jet spray. An IPX6 rating means it can resist powerful water jets. However, technical specifications show that even a basic 1200+ PSI pressure washer can exceed the force these ratings are designed to withstand by 10 to 20 times. That force drives water deep into bearings, stripping away essential grease, and into sealed electronic enclosures, where it can cause short circuits and long-term corrosion.
The damage is often not immediate. Water trapped inside a motor or controller can take days or weeks to cause a failure, leading to a mysterious error code long after the wash. The proper way to clean an e-bike is the old-fashioned way: with a bucket of soapy water, soft brushes, and a low-pressure garden hose for rinsing.
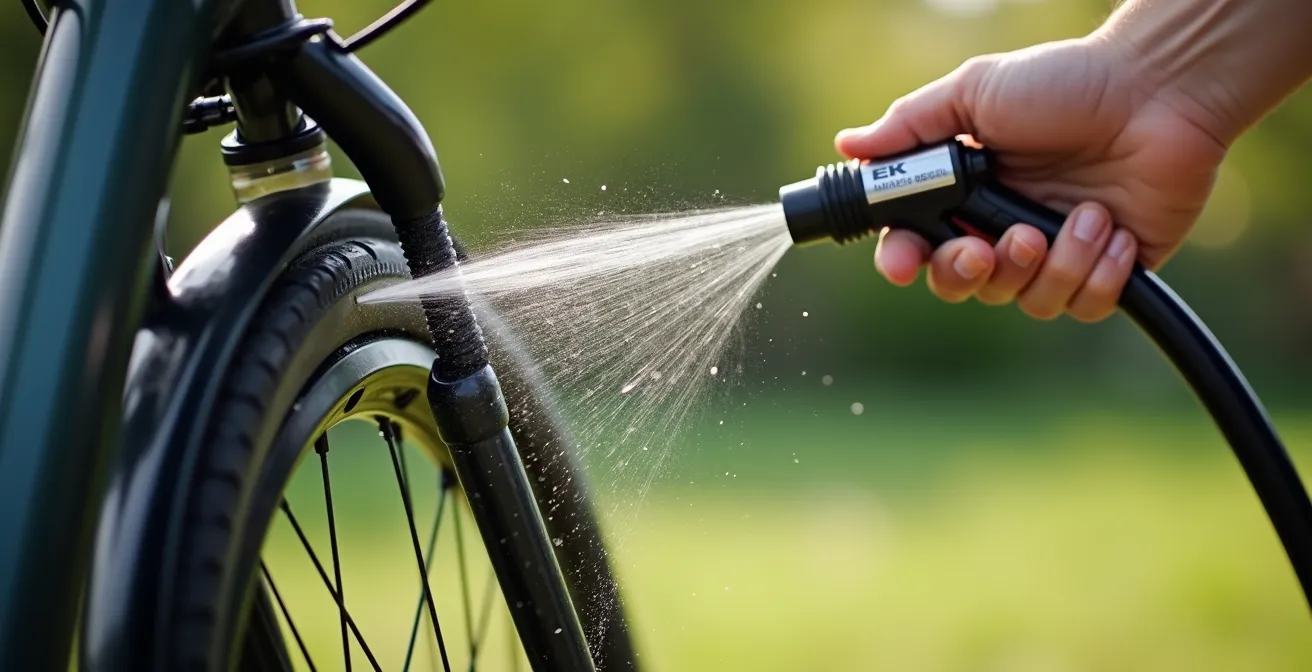
When washing, pay special attention to avoiding spraying water directly at the display, controller housing, and connection points. This gentle method effectively cleans your bike without compromising its electronic integrity and prevents a long list of future error codes.
Think of it this way: you wouldn’t wash your laptop with a pressure washer. Treat your e-bike’s sophisticated electronics with the same level of care.
When to Visit the Shop: Codes You Cannot Fix at Home
A confident DIY approach can solve many e-bike errors, but a smart diagnostician also knows their limits. Certain error codes are intentionally designed to be unfixable at home. These are often related to the system’s core firmware, safety protocols, or require proprietary software and tools available only to certified dealers. Attempting to bypass these can void your warranty or, worse, damage expensive components like the controller or battery.
The most common “do not touch” errors are those locked by software. For instance, if a system detects potential tampering with a speed sensor to bypass speed limits, it may enter a permanent lockdown state that only a dealer can reset. Similarly, firmware mismatches between a new component and an old controller can only be resolved by a dealer with access to the manufacturer’s diagnostic platform. Trying to force a fix without these tools is like trying to pick a digital lock without the key.
A cost analysis of persistent controller errors highlights this point. While DIY attempts might seem cheaper, they have a low success rate and risk further damage. Professional diagnosis, though it has an upfront cost, resolves these software-locked issues with near-certainty. The following list, sourced from a compilation of brand-specific service requirements, outlines common errors that should send you straight to the shop.
Checklist: Error Codes Requiring Professional Service
- Bosch Error 503: This indicates a speed sensor manipulation or magnet issue that persists after a restart. The system enters a “limp mode” that requires a dealer’s diagnostic tool to reset.
- Shimano W-Series Codes (e.g., W103): These codes point to a firmware incompatibility between components. An update using Shimano’s proprietary E-Tube Project software is necessary.
- Specialized TCU/TCD Errors: Many internal faults on Specialized bikes can only be diagnosed and cleared by connecting to the Mission Control app or a dealer’s advanced diagnostic system.
- Brose Internal Faults: Errors related to internal motor sensors or the drive unit often require a connection to the Brose-specific diagnostic platform for accurate fault-finding and resolution.
- Persistent Controller WDT (Watchdog Timer) Errors: If an error indicating an internal controller monitoring failure doesn’t clear after a battery pull, it signifies a serious hardware fault that needs professional assessment.
If you’ve performed the basic checks—connections are secure, pins are clean, a hard reset has been done—and the error persists, you’ve done your job as a first-level diagnostician. Now it’s time to let the experts take over.
The Error of Leaving Bluetooth Always On That Drains 5% Overnight
One of the most insidious issues facing modern e-bike owners isn’t a dramatic failure but a slow, silent drain on the battery. You park your fully charged bike overnight only to find it has lost a noticeable amount of range the next morning. This “vampire” or “parasitic” drain is often caused by a feature designed for convenience: the always-on Bluetooth connection. While it allows for seamless app integration, it keeps a part of your bike’s brain—the controller—in a low-power “listening” state.
This constant listening state, while consuming very little power at any given moment, adds up significantly over time. Each time your phone comes within range or the app polls the bike for data, it wakes the controller, drawing a small amount of current from the battery. Over a 10-12 hour period, this can easily lead to a significant loss of charge. According to battery management data, this continuous connectivity can be responsible for up to a 5% overnight drain, which can translate to a loss of 2-5 miles of available range before your ride even starts.
Bluetooth isn’t the only culprit. Other features can contribute to parasitic drain, such as integrated lights left in a standby mode, USB charging ports that remain active even when nothing is plugged in, or poorly installed aftermarket accessories like GPS trackers wired directly to the battery. The key to a healthy battery is ensuring the bike can go into a deep sleep when parked.
Your Action Plan: Parasitic Drain Prevention Checklist
- Disable Bluetooth: When your ride is finished and the bike is parked, manually disable Bluetooth in your bike’s settings or on your phone. This is the single most effective step.
- Unplug USB Ports: Ensure any integrated USB charging ports are switched off or that you unplug any attached devices or adapters, as they can draw a small current continuously.
- Turn Lights Fully Off: Don’t just set integrated lights to “auto” or standby. Use the master power switch or display setting to turn them completely off.
- Audit Aftermarket Accessories: If you have a GPS tracker or other accessory, check that it’s wired to a switched power source (one that turns off with the bike) and not directly to the battery terminals.
- Perform a Weekly Verification: Fully charge your bike, then leave it parked and untouched for 24 hours. Check the battery level. It should show a drop of less than 1%. If it’s more, you have a parasitic drain to hunt down.
By developing these simple habits, you ensure that every drop of power in your battery is saved for what matters most: your ride.
The Error of Ignoring Sensor Calibration That Causes Power Lag
Have you ever felt a frustrating delay in your e-bike’s power delivery? You push on the pedals, but the motor assist takes a second or two to kick in, creating a jerky and unsatisfying ride. This power lag is rarely a fault of the motor itself. More often, it’s a symptom of an uncalibrated torque sensor. Many riders are unaware that this critical component needs a regular “zero-out” procedure to function correctly, and ignoring it is one of the biggest mistakes affecting ride quality.
E-bikes use two main types of sensors to determine when to apply power: cadence sensors and torque sensors. A cadence sensor is a simple on/off switch; it tells the motor to provide power as soon as you start pedaling. A torque sensor is far more sophisticated. It measures *how hard* you are pressing on the pedals and delivers a proportional amount of assistance. This creates a much more natural and intuitive riding experience. However, for a torque sensor to work accurately, it must know what “zero pressure” feels like. This is where calibration comes in.
If you turn on your e-bike with your foot resting on the pedal, the sensor mistakenly registers that pressure as its new zero point. As a result, it won’t engage the motor until you apply significantly more force than that initial reading. Testing has shown that this can lead to a 30-50% power lag. The fix is incredibly simple: when powering on your bike, make sure there is absolutely no weight on the pedals for the first 3-5 seconds. This allows the sensor to perform its zero-out calibration correctly.
This table from a comparative analysis of sensor technologies breaks down the critical differences in calibration needs.
| Sensor Type | Calibration Need | Frequency | Zero-Out Procedure | Impact if Ignored |
|---|---|---|---|---|
| Cadence Sensor | Rarely required | Only after replacement | Not applicable | Minor timing issues |
| Torque Sensor | Essential | Monthly or after any impact | Power on, don’t touch pedals for 5 seconds | 30-50% power lag, jerky assistance |
| Combined System | Critical | Bi-weekly for optimal performance | Full system reset required | Unpredictable power delivery |
Making this calibration part of your pre-ride routine is a zero-effort way to ensure your e-bike delivers the smooth, immediate power you expect every single time.
Key Takeaways
- Error codes are diagnostic signals, not just failures. Understanding the ‘why’ behind them empowers you to prevent issues.
- Most common errors (21, 30) are caused by simple physical connection problems—loose wires or corrosion—that are fixable with basic “electrical hygiene.”
- A clear reset hierarchy exists: a soft restart fixes software glitches, while a battery pull handles deeper system confusion. Knowing when to use each is crucial.
The 15-Minute Weekly Inspection Routine That Prevents 80% of Roadside Breakdowns
After demystifying individual error codes, the ultimate goal is to prevent them from ever appearing. The vast majority of electronic issues don’t materialize out of thin air; they are the result of gradual wear, vibration, and exposure to the elements. The single most powerful tool you have as an owner is not a wrench or a multimeter, but a consistent inspection routine. By dedicating just 15 minutes a week, you can catch potential problems when they are minor inconveniences, not ride-ending failures.
In fact, maintenance statistics demonstrate that a simple, regular 15-minute inspection can prevent up to 80% of the common error codes before they occur. This proactive approach shifts your role from a reactive troubleshooter to a preventative maintenance expert. The focus of this routine isn’t complex mechanics; it’s a sensory check of your bike’s electronic nervous system: its connectors, cables, and key components.
This routine is built on a simple framework of looking, feeling, and listening. You’re checking for things that have become loose, frayed, or misaligned. You’re looking for the early signs of corrosion or wear at stress points. This small investment of time pays huge dividends in reliability and peace of mind on the road.
Your Action Plan: The 3C Framework Weekly Inspection Protocol
- CONNECTORS (5 min): Go through the main connection points. Gently wiggle the display connector, the motor wire connector (near the rear axle), and the main battery terminals. They should feel snug and secure with no play. Visually inspect the pins for any signs of green or white corrosion.
- CABLES (5 min): Trace the main wiring harnesses. Look for any signs of fraying, kinks, or abrasion, especially where cables bend around the handlebars or pass near the bottom bracket. Ensure they are secured and not rubbing against the frame or tire.
- COMPONENTS (5 min): Check the speed sensor magnet on the wheel spoke. It should be tight and aligned to pass within a few millimeters of the sensor on the frame (this prevents Error 21). Make sure the display mount and battery lock are secure.
- Auditory Check: With the bike on a stand or upside down, turn the pedals and listen. You should hear the quiet hum of the motor, not any unexpected clicks, rubbing sounds (which could be a misaligned sensor), or rattles from a loose battery.
- Documentation: Keep a simple log on your phone. Note any loose fittings or unusual sounds. This helps you track patterns over time and spot a degrading component before it fails.
By making this simple inspection a non-negotiable part of your weekly routine, you are taking ultimate control of your e-bike’s health and ensuring it remains a reliable partner for every journey.