The shocking cost of replacing an e-bike chain isn’t a maintenance failure; it’s a predictable materials science problem caused by motor torque physically stretching the steel.
- High-torque motors cause “micro-stretching” of chain links, which is different from simple surface wear and rapidly destroys cassettes.
- Proper shifting technique (easing pedal pressure) and using specialized lubricants with Extreme Pressure (EP) additives are non-negotiable.
Recommendation: Measure your chain weekly with a proper tool and replace it proactively at 0.5% stretch to save your far more expensive cassette from premature death.
It’s a frustratingly common story for new e-bike owners. You’re enjoying the power, the speed, and the effortless hills, but after a mere 1,000 miles, you get the bad news from your mechanic: your chain is shot, and it’s threatening to take the expensive cassette with it. You’ve been cleaning it, you’ve been oiling it, so what gives? The common advice to “clean your chain” and “shift smoothly” only scratches the surface of a much deeper issue.
The rapid degradation of your e-bike’s drivetrain isn’t just about dirt or bad habits. It’s a battle of physics—a story of immense, sustained torque versus the physical limits of steel. A standard bicycle drivetrain is designed for the sharp, but brief, power peaks of human pedaling. A mid-drive motor, however, applies a relentless, crushing force that standard components were never engineered to withstand. Understanding this fundamental conflict is the only way to move from being a victim of wear to a master of drivetrain management.
This guide will deconstruct the forces at play, moving beyond simple maintenance tips to give you the materials science perspective you need. We will explore why motor torque is so destructive, how to identify the tell-tale signs of wear before it becomes catastrophic, and the specific techniques and technologies that can dramatically extend the life of your components. It’s time to understand the ‘why’ behind the wear and take control of your e-bike’s longevity.
Contents: Why E-Bikes Eat Chains and How to Stop It
- Why 85Nm of Torque Stretches Steel Links Twice as Fast?
- How to Identify “Shark Teeth” on Your Gears Before They Skip?
- Reinforced Pins vs Standard: Is the $30 E-Bike Chain Worth It?
- The Error of Mashing Gears While the Motor Is Peaking
- When to Change the Chain to Save the Expensive Cassette?
- When to Shift Gears on a Mid-Drive to Prevent Drivetrain Snapping?
- Why Standard Bike Oil Fails Under the Torque of a Mid-Drive Motor?
- The 15-Minute Weekly Inspection Routine That Prevents 80% of Roadside Breakdowns
Why 85Nm of Torque Stretches Steel Links Twice as Fast?
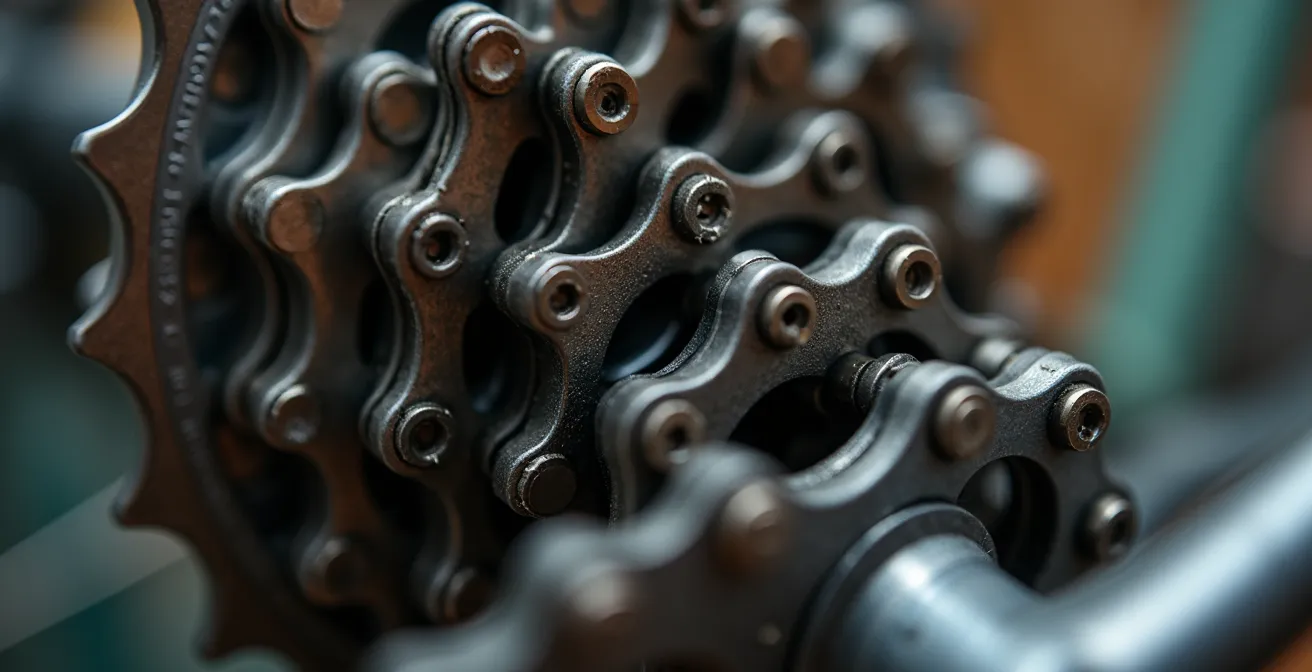
The core of the problem lies in a fundamental misunderstanding of torque. A fit human cyclist might generate a peak of 40-50Nm of torque in a short burst. In contrast, many modern mid-drive ebikes deliver 50-90Nm of sustained torque. It’s not the peak number that’s the killer; it’s the “sustained” part. Your drivetrain is constantly under a level of force that, on a non-electric bike, would only occur for a fraction of a second during an all-out sprint. This constant, high-load environment doesn’t just wear the surface of your chain; it causes micro-stretching. The steel in the chain’s pins and rollers is physically elongated, link by link, under the relentless pull of the motor.
This stretching is exacerbated by low-cadence “mashing”—pedaling slowly in a hard gear. This forces the motor to deliver maximum torque to maintain speed, which puts maximum strain on the chain. Riding at a higher cadence (spinning the pedals faster in an easier gear) allows the motor to operate more efficiently with less force, significantly reducing the strain on every component.
This table illustrates the direct relationship between your pedaling speed and the destructive forces acting on your chain. Mashing at a low cadence isn’t just inefficient; it’s actively accelerating the destruction of your drivetrain.
| Cadence (RPM) | Relative Chain Force | Wear Impact |
|---|---|---|
| 30 (slow mashing) | 100% (maximum) | Severe micro-stretching |
| 60 (moderate) | 50% | Normal wear |
| 90 (spinning) | 33% | Minimal wear |
Understanding this concept is the first step: you are not just fighting friction; you are fighting the physics of metal fatigue. Every time you choose a harder gear over a faster cadence, you are actively choosing to shorten the life of your chain.
How to Identify “Shark Teeth” on Your Gears Before They Skip?
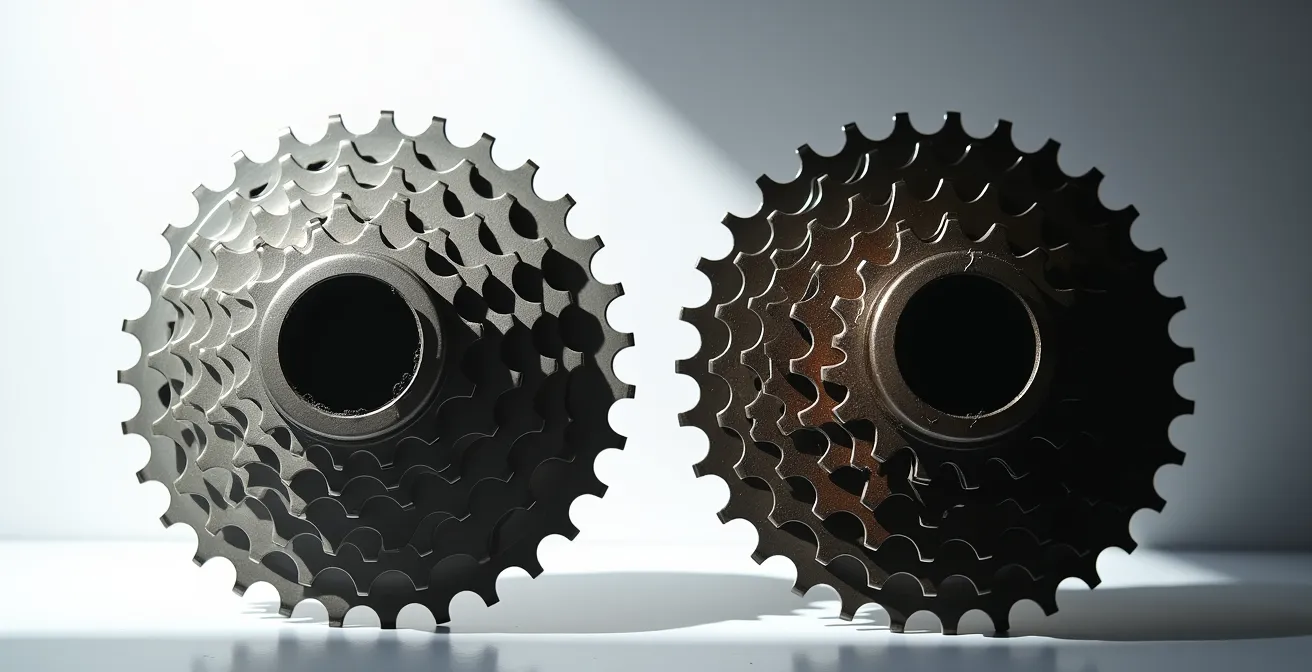
When a chain “stretches,” the precise distance between each roller increases. A new chain has a perfect pitch of 0.5 inches between pins. A stretched chain might have 0.502 inches. This tiny difference means the chain rollers no longer seat perfectly in the valleys between the cassette teeth. Instead, they ride up the face of the tooth, concentrating all the motor’s force onto a single point. This action progressively grinds away the metal of the cassette cog, reshaping it from a symmetrical valley into a hooked, pointed profile known as “shark teeth.” Once your cassette develops these sharp teeth, it is permanently damaged. It will no longer mesh with a new, unstretched chain, causing skipping and poor shifting even after you replace the chain itself.
To see what this wear pattern looks like, compare a new gear to a worn one. The difference is stark and reveals the destructive power of a stretched chain.
Detecting this wear early is the key to saving your expensive cassette. Don’t wait for the chain to start skipping under load, as by then it’s often too late. You need to be proactive. Here are the key indicators that your cassette is developing shark teeth:
- Audible Cues: Listen for a distinct ‘clicking’ or ‘slapping’ sound when pedaling hard, especially in your most-used gears. This is the sound of the chain rollers climbing the worn tooth faces before crashing back into place.
- Visual Inspection: Clean your cassette thoroughly and look at the profile of the teeth on the cogs you use most often. Are they still symmetrical, or are they starting to look hooked and pointed like a shark’s fin?
- The New Chain Test: The definitive test is to install a brand-new chain on the suspect cassette. If it skips immediately under power on the first ride, the cassette cogs are worn beyond recovery and must be replaced.
Identifying these signs early allows you to replace only the relatively inexpensive chain, protecting the much more costly cassette from needing replacement as well.
Reinforced Pins vs Standard: Is the $30 E-Bike Chain Worth It?
When faced with a $15 standard chain versus a $40 e-bike specific chain, the choice seems obvious. Why pay nearly three times as much? The answer lies in the hidden engineering designed to combat the micro-stretching we’ve discussed. A standard chain is built to be lightweight and shift quickly under human power. An e-bike chain is a piece of industrial hardware built for durability under extreme, sustained loads. The extra cost is not for marketing; it’s for advanced metallurgy and construction.
Manufacturers like KMC Chain build their e-bike specific models with features that are invisible to the naked eye but critical for longevity. This includes using higher-grade steel alloys, applying special heat treatments to harden the rollers and plates, and, most importantly, using significantly stronger pin riveting. The “pin power,” or the force required to push a pin out of the chain plate, can be 30% higher than on standard chains. This robust construction directly resists the stretching forces from the motor.
Case Study: The Engineering of an E-Bike Chain
KMC’s engineering data for their e-bike specific chains reveals the stark differences. They use riveting processes that achieve over 450 kgf of pin power, far exceeding international standards. The components undergo special heat treatments to increase hardness and reduce deformation. In testing, these chains can withstand the pulling force equivalent to the weight of a small car and are rated for a lifespan of up to 7500 km under e-bike conditions—potentially three times longer than a standard chain in the same environment.
While a standard chain might last only a few hundred miles before hitting the critical 0.5% stretch mark, many e-bike specific chains typically achieve a 2000-2500 miles lifespan under similar conditions. When you factor in the cost of a new cassette ($100-$400) that you’ll have to buy if you let a cheap chain stretch too far, the more expensive e-bike chain isn’t just worth it; it’s an essential investment that saves you significant money in the long run.
The Error of Mashing Gears While the Motor Is Peaking
One of the most destructive habits for an e-bike drivetrain is shifting under full power. When you press the shifter while the motor is delivering peak torque, you are forcing the chain to move sideways while it is under immense tension. This action can cause the chain to get caught between cogs or ride up over the top of the teeth instead of seating correctly. This doesn’t just cause a loud, grating noise; it actively twists and damages the chain links and chews up the teeth of your cassette.
As one expert on a popular cycling forum bluntly puts it, the physics of the situation are unforgiving. A chain under that much tension simply cannot execute the delicate sideways movement required for a clean shift.
Shifting under (mid motor) load results in the chain not setting in time and thus twisting over the top of the cassette.
– Forum Expert, Bike Forums E-bike Discussion
The solution is to adopt the “micro-pause” shifting technique. It’s a subtle but crucial change in your riding style that protects your entire drivetrain. The goal is to momentarily unload the pedals just before and during the shift, giving the chain the slack it needs to move to the next gear smoothly. This doesn’t mean you have to stop pedaling, but rather to consciously ease off the pressure for a split second. Mastering this technique is one of the single most effective things you can do to extend the life of your components.
- Anticipate: Look ahead and anticipate the need to shift 1-2 seconds before you need the new gear.
- Ease Off: For about half a second, consciously reduce the pressure on your pedals. You’re still turning them, but not pushing hard.
- Shift: Initiate the shift during this moment of reduced load.
- Re-engage: Once you feel the chain seat into the new gear, smoothly reapply full pedal pressure.
- Listen: Pay attention to the sound of your motor. A low-pitched “groan” is a sign of high load, indicating you should have shifted to an easier gear sooner.
When to Change the Chain to Save the Expensive Cassette?
This is the most critical question in e-bike drivetrain maintenance, and the answer is likely “sooner than you think.” Because of the rapid micro-stretching caused by motor torque, the window for replacing the chain is much smaller than on a regular bike. For most analog bikes, the rule of thumb is to replace the chain when it reaches 0.75% stretch. For a high-torque mid-drive e-bike, that is far too late. At 0.75% stretch, the chain has already done significant damage to your cassette and possibly your chainring. For e-bikes, the critical wear mark is 0.5% stretch. For many riders under high-load conditions, mid-drive motors typically require chain replacement every 1000 miles or even less to stay within this safe zone.
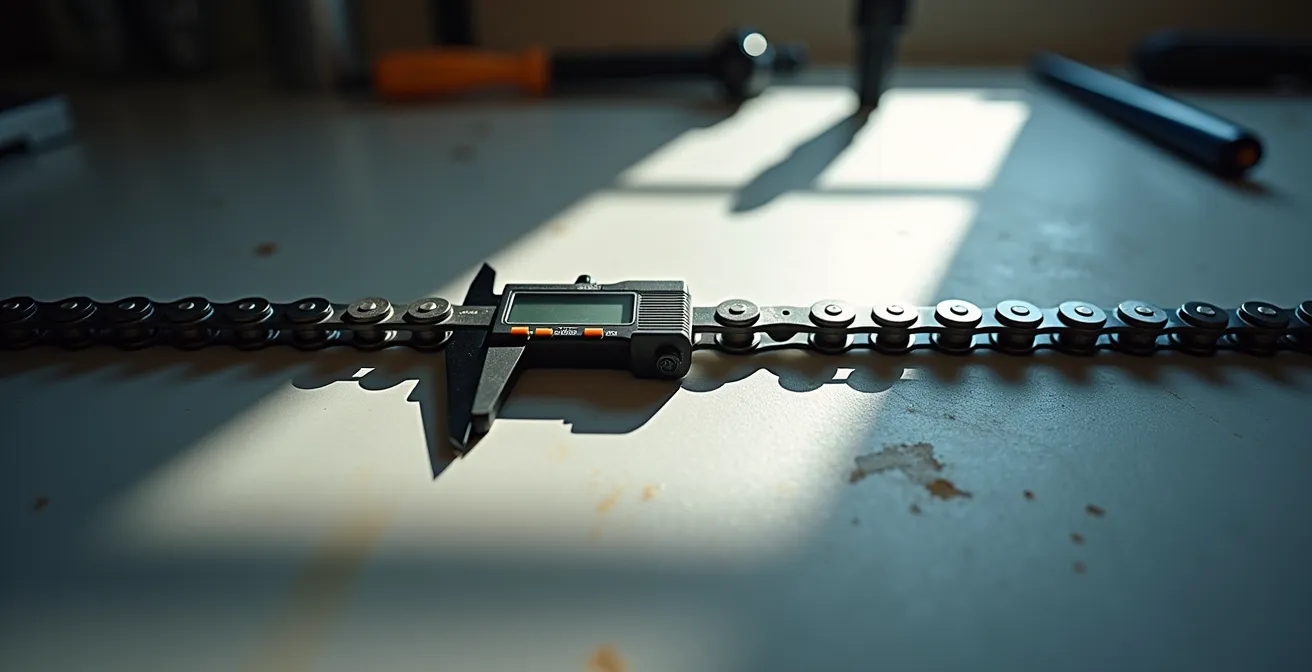
Waiting until your shifting feels poor is a recipe for a very expensive repair bill. You must proactively monitor your chain’s health. This requires the right tool and a consistent routine. A simple “go/no-go” chain checker is good for a quick weekly check, but for precise measurement, a digital caliper is the professional’s choice. By measuring a 12-link section, you can get an exact percentage of wear and make an informed decision.
To avoid guesswork and costly mistakes, you need a systematic approach to monitoring chain wear. The following checklist is a professional-grade system for tracking and managing the health of your drivetrain.
Your Action Plan: E-Bike Chain Wear Monitoring System
- Weekly Quick Check: Use a simple go/no-go chain checker tool. If the 0.5% side drops in, it’s time for a more precise measurement.
- Bi-Monthly Precision Measurement: Use a digital caliper. Stretch the chain taut and measure the distance over exactly 12 full links (from the center of the first pin to the center of the 13th pin). A new chain will measure exactly 12 inches.
- Execute Replacement: If your measurement is 12 1/16 inches (which corresponds to 0.5% stretch), replace the chain immediately to preserve the life of your cassette and chainrings. Do not wait.
- Create a Mileage Log: Keep a simple spreadsheet or notebook. Track the date, total bike mileage, chain measurement, and general riding conditions (e.g., wet, hilly). This data will help you predict your personal replacement interval.
- Budget and Plan: Based on your log, anticipate the cost of a new chain. For aggressive eMTB use, you might expect a replacement every 400-1000km (250-625 miles), so planning ahead prevents surprises.
When to Shift Gears on a Mid-Drive to Prevent Drivetrain Snapping?
Beyond simple wear and tear, improper shifting can lead to catastrophic failure: a snapped chain. This is most common in a very specific scenario that e-bike mechanics see time and time again. It happens when a rider comes to a complete stop (like at a red light or stop sign) while still in a hard, high gear. When the light turns green, the rider pushes hard on the pedals, engaging the motor’s full, instantaneous torque against a drivetrain that is at maximum resistance. This confluence of peak motor force and peak drivetrain resistance creates a massive shock load that the chain simply cannot handle, often causing it to snap.
The solution is not just about shifting smoothly while moving, but about thinking ahead and preparing the drivetrain for the next takeoff. Experienced riders adopt an anticipatory shifting protocol to ensure the motor’s power is always applied against minimal resistance.
Case Study: The Red Light Chain Snap Prevention Strategy
Mechanics analyzing common chain failures found a recurring theme: starting from a dead stop in a high gear. The most effective preventative strategy, now taught to e-bike owners, is to always shift down into an easy “takeoff gear” *while braking* to a stop. This ensures that when you start pedaling again, the motor’s initial high-torque engagement is met with low drivetrain resistance. This simple habit completely eliminates the peak shock force that is the primary cause of catastrophic chain snaps from a standstill.
Anticipatory shifting is a mindset. It’s about thinking one step ahead of the terrain and the traffic, ensuring your gears are always in the optimal position *before* you need to apply power. This not only prevents failures but also results in a smoother, more efficient, and more enjoyable ride.
- Before Hills: Shift to an easier gear before the gradient begins to increase, not after you start to feel the resistance build.
- At Stops: As you brake for a traffic light or stop sign, actively downshift through your gears so you are in an easy starting gear (e.g., 3rd or 4th largest cog on the cassette) before you come to a complete stop.
- In Traffic: When approaching slowing traffic, begin downshifting proactively so you are ready to accelerate smoothly if a gap opens up.
- On Technical Trails: Before an obstacle that will require a burst of power (like a root or rock step-up), pre-shift into a much easier gear than you think you need.
Why Standard Bike Oil Fails Under the Torque of a Mid-Drive Motor?
Just as e-bikes require specialized chains, they also demand specialized lubricants. The immense pressure between the chain’s rollers and the gear teeth on an e-bike is far beyond what standard “dry” or “wet” lubes are designed for. Under the high torque of a mid-drive motor, the lubricant film from a standard oil can experience “shear breakdown.” This means the pressure physically squeezes the oil out from between the metal surfaces, leaving them unprotected and leading to accelerated metal-on-metal wear.
E-bike specific lubricants are formulated more like automotive gear oil than simple bicycle lube. They contain Extreme Pressure (EP) additives, such as zinc or molybdenum. These compounds are the key to protecting your drivetrain under load. They create a sacrificial film that bonds to the metal surfaces only under immense heat and pressure, providing a layer of protection precisely when and where it’s needed most. Standard lubes lack these critical additives.
Case Study: Extreme Pressure Additives in Action
Laboratory tests comparing standard bike oils to e-bike specific formulas show a dramatic difference under simulated high-torque loads. Standard oils quickly lose their viscosity and protective properties, a process known as shear breakdown. In contrast, lubricants with EP additives like zinc or molybdenum form a durable, sacrificial film on the metal surfaces. This film prevents direct metal-on-metal contact even under the extreme pressures found in a mid-drive drivetrain, significantly reducing wear on chain rollers and cassette teeth.
Choosing the right type of e-bike lubricant also depends on your riding conditions. While all should contain EP additives, their base formula will vary. A wax-based lube might be cleaner in dry conditions but require more frequent application, while an oil-based “wet” lube will offer better protection in rain and mud but can attract more dirt.
| Lube Type | Best Conditions | Application Frequency | Pros | Cons |
|---|---|---|---|---|
| Wet Lube (Oil-based) | Rain, mud, winter | Every 100-150km | Repels water, prevents rust | Attracts dirt, messy |
| Dry Lube (Wax-based) | Dry, dusty conditions | Every 50-100km | Clean, minimal dirt attraction | Washes off in wet conditions |
| Ceramic/Hybrid | Mixed conditions | Every 150-200km | Balanced protection | More expensive |
Key Takeaways
- E-bike motor torque causes physical “micro-stretching” of the chain steel, which is the primary cause of wear, not just surface friction.
- You must replace your chain at 0.5% stretch, not the 0.75% standard for analog bikes. This single action will save your expensive cassette.
- Using an e-bike specific chain, a specialized lubricant with EP additives, and adopting the “micro-pause” shifting technique are non-negotiable for drivetrain longevity.
The 15-Minute Weekly Inspection Routine That Prevents 80% of Roadside Breakdowns
Knowledge is useless without action. All the understanding of torque, wear patterns, and lubrication science culminates in one simple, proactive routine: a weekly 15-minute inspection. This small investment of time is the most powerful tool you have to prevent premature wear, avoid costly repairs, and eliminate the frustration of a roadside breakdown. Studies and mechanic reports suggest that regular weekly inspections achieve an 80% breakdown prevention rate. It’s about catching small issues before they become catastrophic failures.
This isn’t a full-blown service, but a quick, focused check of the most critical systems in your drivetrain ecosystem. Make it a habit, like checking the air in your tires. Do it every Sunday evening so you’re ready for the week ahead. Your routine should be a systematic tour of the drivetrain’s key stress points.
Start with a “Drivetrain Listening Tour.” With the bike in a stand or the rear wheel lifted, slowly pedal backward and listen. Any clicks, rumbles, or grinding noises from the derailleur jockey wheels or the freehub are early warnings that something needs cleaning, lubrication, or adjustment. Next, perform a Quick-Link Integrity Check by visually inspecting the master link on your chain. Ensure it’s properly seated and shows no signs of widening or damage. The most critical step, as we’ve discussed, is the Chain Stretch Measurement. Use your chain checker or caliper every single week. Finally, if you have a torque wrench, a quick Systemic Torque Check of the chainring bolts (typically 6-8 Nm) and cassette lockring (a high 40 Nm) ensures nothing is working its way loose under the motor’s vibrations.
This routine transforms you from a passive rider into an active manager of your bike’s health. It builds a deeper connection with your machine and gives you the confidence that it will perform reliably when you need it most.
Take control of your drivetrain’s health. Start implementing this weekly inspection routine today to save money, prevent breakdowns, and enjoy a smoother, more reliable ride for thousands of miles to come.